- Technical development of final projects:
- Covered basic time remaping to layout test frames of the spaceship in After Effects with Matthew.
- Assisted the export of Allison's 'The Dream' animation from Flash and we began to cover a pipeline for compiling her completed videos post-access to College equipment: 'Images To Video' software to process her images to a movie file and plugins for Windows Movie Maker XP for HD exports. - The new stop motion armature was completed earlier this month and is now available for use!

Wednesday, 25 January 2012
Notes from the 25th January session
Notes

Tech Cues - Time Remapping in AE
As I've been showing this feature of After Effects to several of you in the past weeks, I thought it might be useful to post a recap on how to do Time Remapping as a refresher.
The Time Remap effect lets you change when each frame of a piece of footage or composition is displayed in your current composition. It's useful for:

This adds the Time Remap property as a dropdown on the layer. The number displayed is the corresponding frame of the footage layer which will be shown in your current composition based on where you are on the timeline.

You will begin with a keyframe at the start and end of the footage and the length of the footage will equal the same as the total number of frames it has available. You can now stretch the end of the coloured footage bar to the right, beyond it's maximum frames, to make the layer stay on screen for longer (without moving the keyframes, this basically creates a freeze frame at the end of your footage).
However, the power of Time Remap comes from adding and adjusting additional keyframes.

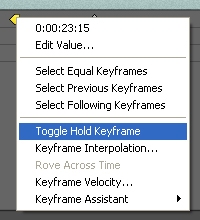 If you want the changes to happen exactly on each frame you need to apply a 'hold keyframe'. To do this right click on the keyframe you want to hold and select Toggle Hold Keyframe.

 The easiest way to visualise the change that your values are having is to see the keyframes in graph view. Activate this by clicking the Graph button near the top left of the timeline panel.

The Time Remap effect lets you change when each frame of a piece of footage or composition is displayed in your current composition. It's useful for:
- Slowing down or speeding up footage
- Adding freeze frames
- Reversing footage
- Skipping over sections of footage you don't want without having multiple layers of the same footage
- Laying out a set of storyboard frames
- A mixture of the above and other more complex effects

Begin by right clicking on the footage or composition layer you want to apply the effect to, and navigate to Time > Enable Time Remapping.
This adds the Time Remap property as a dropdown on the layer. The number displayed is the corresponding frame of the footage layer which will be shown in your current composition based on where you are on the timeline.

You will begin with a keyframe at the start and end of the footage and the length of the footage will equal the same as the total number of frames it has available. You can now stretch the end of the coloured footage bar to the right, beyond it's maximum frames, to make the layer stay on screen for longer (without moving the keyframes, this basically creates a freeze frame at the end of your footage).
However, the power of Time Remap comes from adding and adjusting additional keyframes.

Once you have middle keyframes, you can change their frame values to alter the way time changes between each keyframe: forwards, backwards, freezeframe, fast, slow and skip.
The default type of keyframe tries to evenly space the available frames either side of it. Thus if you have only one frame difference between the values of two keys but several frames of space between them on the timeline (for example, you are spacing out storyboard frames across an animatic) the change of image will happen half way between the keys rather than when you reach the second keyframe.
If you want the changes to happen exactly on each frame you need to apply a 'hold keyframe'. To do this right click on the keyframe you want to hold and select Toggle Hold Keyframe.
The keyframe will change to have a square side on its outward right edge.
The easiest way to visualise the change that your values are having is to see the keyframes in graph view. Activate this by clicking the Graph button near the top left of the timeline panel.
In this view the time of your current composition runs along the X axis and the frame number of your footage is represented up the Y axis.
There are a great many ways to position keyframes in relation to each other, here are some examples:

Footage plays forwards, freeze frames, then carries on from where it left off.
Footage plays forwards, has a fast section, then carries on at the original speed.
Footage plays forwards, then plays backwards, then plays forwards again but at a slightly slower speed.
Footage plays forwards, freeze frames, then skips some frames before carrying on playing forwards.
Footage plays forwards, then jumps back some frames before playing forward again, thus repeating some of the footage already seen.
All of these example keys are linear and thus have sharp changes in speed, but you can add the usual slow in and slow out / fast in and fast out for even more variation.
Ronald Searle (1920 - 2011)

For anyone who hadn't heard the news earlier this month, the legendary cartoonist Ronald Searle has died at the grand age of 91.
http://www.bbc.co.uk/news/entertainment-arts-16391857
Widely known for his St. Trinians school cartoons (the inspiration for the films of the same name), he was a witty and sharp minded artist who's repertoire reached far beyond his most identified work and his influence has been felt by artists all around the world. His passing is a very sad loss for the illustration profession.
Biography
http://www.bpib.com/illustrat/searle.htm
Subscribe to:
Posts (Atom)