- Technical development of final projects:
- Covered basic time remaping to layout test frames of the spaceship in After Effects with Matthew.
- Assisted the export of Allison's 'The Dream' animation from Flash and we began to cover a pipeline for compiling her completed videos post-access to College equipment: 'Images To Video' software to process her images to a movie file and plugins for Windows Movie Maker XP for HD exports. - The new stop motion armature was completed earlier this month and is now available for use!

Wednesday, 25 January 2012
Notes from the 25th January session
Notes
Tech Cues - Time Remapping in AE
As I've been showing this feature of After Effects to several of you in the past weeks, I thought it might be useful to post a recap on how to do Time Remapping as a refresher.
The Time Remap effect lets you change when each frame of a piece of footage or composition is displayed in your current composition. It's useful for:

This adds the Time Remap property as a dropdown on the layer. The number displayed is the corresponding frame of the footage layer which will be shown in your current composition based on where you are on the timeline.

You will begin with a keyframe at the start and end of the footage and the length of the footage will equal the same as the total number of frames it has available. You can now stretch the end of the coloured footage bar to the right, beyond it's maximum frames, to make the layer stay on screen for longer (without moving the keyframes, this basically creates a freeze frame at the end of your footage).
However, the power of Time Remap comes from adding and adjusting additional keyframes.

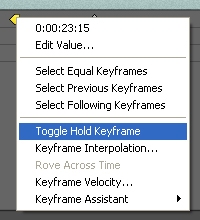 If you want the changes to happen exactly on each frame you need to apply a 'hold keyframe'. To do this right click on the keyframe you want to hold and select Toggle Hold Keyframe.

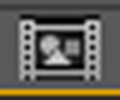
 The easiest way to visualise the change that your values are having is to see the keyframes in graph view. Activate this by clicking the Graph button near the top left of the timeline panel.

The Time Remap effect lets you change when each frame of a piece of footage or composition is displayed in your current composition. It's useful for:
- Slowing down or speeding up footage
- Adding freeze frames
- Reversing footage
- Skipping over sections of footage you don't want without having multiple layers of the same footage
- Laying out a set of storyboard frames
- A mixture of the above and other more complex effects

Begin by right clicking on the footage or composition layer you want to apply the effect to, and navigate to Time > Enable Time Remapping.
This adds the Time Remap property as a dropdown on the layer. The number displayed is the corresponding frame of the footage layer which will be shown in your current composition based on where you are on the timeline.

You will begin with a keyframe at the start and end of the footage and the length of the footage will equal the same as the total number of frames it has available. You can now stretch the end of the coloured footage bar to the right, beyond it's maximum frames, to make the layer stay on screen for longer (without moving the keyframes, this basically creates a freeze frame at the end of your footage).
However, the power of Time Remap comes from adding and adjusting additional keyframes.

Once you have middle keyframes, you can change their frame values to alter the way time changes between each keyframe: forwards, backwards, freezeframe, fast, slow and skip.
The default type of keyframe tries to evenly space the available frames either side of it. Thus if you have only one frame difference between the values of two keys but several frames of space between them on the timeline (for example, you are spacing out storyboard frames across an animatic) the change of image will happen half way between the keys rather than when you reach the second keyframe.
If you want the changes to happen exactly on each frame you need to apply a 'hold keyframe'. To do this right click on the keyframe you want to hold and select Toggle Hold Keyframe.
The keyframe will change to have a square side on its outward right edge.
The easiest way to visualise the change that your values are having is to see the keyframes in graph view. Activate this by clicking the Graph button near the top left of the timeline panel.
In this view the time of your current composition runs along the X axis and the frame number of your footage is represented up the Y axis.
There are a great many ways to position keyframes in relation to each other, here are some examples:

Footage plays forwards, freeze frames, then carries on from where it left off.
Footage plays forwards, has a fast section, then carries on at the original speed.
Footage plays forwards, then plays backwards, then plays forwards again but at a slightly slower speed.
Footage plays forwards, freeze frames, then skips some frames before carrying on playing forwards.
Footage plays forwards, then jumps back some frames before playing forward again, thus repeating some of the footage already seen.
All of these example keys are linear and thus have sharp changes in speed, but you can add the usual slow in and slow out / fast in and fast out for even more variation.
Ronald Searle (1920 - 2011)

For anyone who hadn't heard the news earlier this month, the legendary cartoonist Ronald Searle has died at the grand age of 91.
http://www.bbc.co.uk/news/entertainment-arts-16391857
Widely known for his St. Trinians school cartoons (the inspiration for the films of the same name), he was a witty and sharp minded artist who's repertoire reached far beyond his most identified work and his influence has been felt by artists all around the world. His passing is a very sad loss for the illustration profession.
Biography
http://www.bpib.com/illustrat/searle.htm
Film Watch - The Artist
We'll start the new year's Film Watch listings with something a bit different, The Artist, a new black and white silent film. I recomend experiencing it on the big screen rather than waiting for the DVD release! (It's on at FACT http://www.fact.co.uk/whats-on/the-artist?listing_id=2550)
Oscar Nominations
The nominations for the Oscars are out, and I always make sure I take a look at the short animation catagory to see what the competition is (as you can see from this year's collection, sometimes there aren't very many steps from making a low budget, independant film to being recognised at this level.)
A Morning Stroll
by
Grant Orchard and Sue Goffe
Dimanche / Sunday
by
Patrick Doyon
The Fantastic Flying Books of Mr. Morris Lessmore
by
William Joyce and Brandon Oldenburg
La Luna
by
Enrico Casarosa
Wild Life
by
Amanda Forbis and Wendy Tilby
Wednesday, 18 January 2012
Freelancing - Staying on the right side of the law
For those who are remembering to check the blog regularly, here's a freebe toward your research for professional practise. A few bits of information on starting up as freelance and good practise toward having a stress free time come tax-return time! (figures quoted below correct for 2011-12)
So you've completed your course and through your blogging and tweets you've got a few people interested in paying you for some freelance illustration or animation work, the jobs are straightforward and the money sounds good... but have you considered what your working status is now?
Freelance, Independent artist, Creative consultant - just a few of the catch-all names people use in the industry to describe working for themselves. Being self employed is a bit different to working for a business as an employee, and it's important to know early on or ahead of time exactly what your responsibilities are with things like record keeping, tax and working life.
First you'll need to regester as self employed and get your Unique Taxpayer Number (if you have a student loan, they'll want to know this number too so they can take repayments from your self employed profits). Just ring the HMRC newly self employed hotline: 0845 915 4515
Do you want to operate under your own name?
e.g. Paul Summers independent illustrator
Or are you planning on having a business name?
e.g. Sunshine Illustration
If you have a business name other than your own, you need to make sure all your business stationary (letters, invoices, cards, emails etc.) clearly include BOTH your name and your business' name.
Also make sure your chosen business name isn't already in use! (see links below for a name checker)
You'll need to start paying Class 2 contributions for National Insurance (£2.50 a week) and if you earn £7225 or more per year from your work you'll need to pay Class 4 contributions also (a % of your higher profits). Though if you earn less than £5,315 you can CHOOSE to get exemption from paying Class 2, but be aware that if you do choose not to pay them you won't then recieve credit for National Insurence payments for that period, which can affect your access to certain pension and other govenment service related benifits later down the line.
Once you are up and running you'll want to keep reasonably detailed records of the movement of money in and out of the business.
It's worth building yourself a spreadsheet or buying a finance ledger where you can note down income and business expences - Note that if you are working from home, you can alocate a PROPORTION of certain building costs RELEVENT to the business - electricity, telephone landline/mobile, internet, councel tax, home insurance, rent etc. (the proportion is based on number of rooms in the home and amount of time spent on business use of the costs being clamed for - see HMRC guidence for more info)
Also set up an invoice template with your name, your business name (if you have one), date, person or business being invoiced, description of the work you have done, cost you are charging and instructions on how to pay you. Make sure you invoice promptly, it encorages clients to pay up while it's fresh in their mind and don't be scared to follow up on unpaid invoices if they are taking an unreasonable amount of time to pay. Consider agreeing before you start a project that half the money will be payed once you are part way through the project - this keeps your cash flow more stable and protects you against slow paying clients.
Business related travel costs and learning can also be accounted for (see HMRC guidence for more info)
And remember you need to keep these records of all these things for a minimum of 5 tax-years
That's hopefully a brief bit of information to get you thinking. I encorage you all to read some of the govenment and independent organisation help websites for detailed guidence on different aspects of self employment.
Also consider going on some of the FREE 'Starting up in self employment' help workshops:
- Newly self employed
- Business Expenses and Capital Allowances for the Self Employed
- Self Assessment Online
http://www.hmrc.gov.uk/bst/advice-teams-area/map2.htm
http://www.hmrc.gov.uk/workshophandouts/
HM Revenue & Customs
http://www.hmrc.gov.uk/selfemployed/index.shtml
Regester for self assesment tax
http://www.hmrc.gov.uk/sa/register.htm
Record keeping
http://www.hmrc.gov.uk/sa/rec-keep-self-emp.htm
Business Link
http://www.businesslink.gov.uk/
Setting up as self employed
http://www.businesslink.gov.uk/bdotg/action/layer?topicId=1073875654
Business name checker
http://www.businesslink.gov.uk/bdotg/action/cntc
Direct.gov
Newly self-employed helpline
http://www.direct.gov.uk/en/Dl1/Directories/DG_10011000
Tax information
http://www.direct.gov.uk/en/MoneyTaxAndBenefits/Taxes/WorkingAndPayingTax/DG_185198
----------
Freelance, Independent artist, Creative consultant - just a few of the catch-all names people use in the industry to describe working for themselves. Being self employed is a bit different to working for a business as an employee, and it's important to know early on or ahead of time exactly what your responsibilities are with things like record keeping, tax and working life.
----------
Do you want to operate under your own name?
e.g. Paul Summers independent illustrator
Or are you planning on having a business name?
e.g. Sunshine Illustration
If you have a business name other than your own, you need to make sure all your business stationary (letters, invoices, cards, emails etc.) clearly include BOTH your name and your business' name.
Also make sure your chosen business name isn't already in use! (see links below for a name checker)
You'll need to start paying Class 2 contributions for National Insurance (£2.50 a week) and if you earn £7225 or more per year from your work you'll need to pay Class 4 contributions also (a % of your higher profits). Though if you earn less than £5,315 you can CHOOSE to get exemption from paying Class 2, but be aware that if you do choose not to pay them you won't then recieve credit for National Insurence payments for that period, which can affect your access to certain pension and other govenment service related benifits later down the line.
----------
It's worth building yourself a spreadsheet or buying a finance ledger where you can note down income and business expences - Note that if you are working from home, you can alocate a PROPORTION of certain building costs RELEVENT to the business - electricity, telephone landline/mobile, internet, councel tax, home insurance, rent etc. (the proportion is based on number of rooms in the home and amount of time spent on business use of the costs being clamed for - see HMRC guidence for more info)
Also set up an invoice template with your name, your business name (if you have one), date, person or business being invoiced, description of the work you have done, cost you are charging and instructions on how to pay you. Make sure you invoice promptly, it encorages clients to pay up while it's fresh in their mind and don't be scared to follow up on unpaid invoices if they are taking an unreasonable amount of time to pay. Consider agreeing before you start a project that half the money will be payed once you are part way through the project - this keeps your cash flow more stable and protects you against slow paying clients.
Business related travel costs and learning can also be accounted for (see HMRC guidence for more info)
And remember you need to keep these records of all these things for a minimum of 5 tax-years
----------
Also consider going on some of the FREE 'Starting up in self employment' help workshops:
- Newly self employed
- Business Expenses and Capital Allowances for the Self Employed
- Self Assessment Online
http://www.hmrc.gov.uk/bst/advice-teams-area/map2.htm
http://www.hmrc.gov.uk/workshophandouts/
----------
http://www.hmrc.gov.uk/selfemployed/index.shtml
Regester for self assesment tax
http://www.hmrc.gov.uk/sa/register.htm
Record keeping
http://www.hmrc.gov.uk/sa/rec-keep-self-emp.htm
Business Link
http://www.businesslink.gov.uk/
Setting up as self employed
http://www.businesslink.gov.uk/bdotg/action/layer?topicId=1073875654
Business name checker
http://www.businesslink.gov.uk/bdotg/action/cntc
Direct.gov
Newly self-employed helpline
http://www.direct.gov.uk/en/Dl1/Directories/DG_10011000
Tax information
http://www.direct.gov.uk/en/MoneyTaxAndBenefits/Taxes/WorkingAndPayingTax/DG_185198
Wednesday, 11 January 2012
Tech Cues - After Effects Primer
Happy New Year to you all! As I've begun to cover some basic tools in After Effects with some of you, I thought we'd start off with a few words to reintroduce you to the basic interface ellements.
Upon opening AE you'll be greated with a blank canvas. Toolbar running along the top left, Project and Effect controls tabs to the middle left, Composition stage in the centre, Layers pannel bottom left and Timeline bottom right.
The first thing you'll need to do is Import some footage. Go to the Project pannel and right click to bring up the menu below.

 Once you import your files they form an asset list in the Project pannel you can then drag them onto the Stage or Layers pannel if you already have a composition underway, or drag a file onto the New composition icon at the bottom of the Project pannel to automatically create a composition with the same dimentions and length as the footage you are choosing to start with.
Clicking on the drop-down arrows on different layers gives you access to their basic Transform controls:
- Anchor Point sets the centre of scale and rotation changes as well as sets the point about from which the position is calculated. [A]
- Position is the X,Y co-ordinates of each layer based on its anchor point, also a Z co-ordinate will be present if the layer is told to use the faux 3D stage space. [P]
- Scale lets you make a layer bigger or smaller. [S]
- Rotation lets you spin a layer clockwise or anti-clockwise about its anchor point, also Y and Z rotations become available if the layer is made to use the 3D space. [R]
- Opacity lets you turn a layer from solid opaque at 100% through varying transparency 99-01% all the way to totally invisible at 0%. [T]
 You can set keyframes on these attributes by first clicking on the Stopwatch icon and then altering the values in the layer pannel or directly on the stage, at different frames of the composition. Keyframes are represented by grey diamonds (or yellow if selected with the mouse) on the timeline.
Use the Timeline to move back and forth through the frames of your composition. The thick grey bar with yellow ends controlls the section of the composition you will output when rendering and also the rage you will preview with quick cache-renders. The thinner grey bar with yellow ends controlls the length and section of composition you have displayed in the timeline (the rest of the composition sits beyond the boundries either side). The pointed yellow tab and red line shows your current position within the composition's frames.

Subscribe to:
Posts (Atom)