A quick post main aimed at Paul for outputting his Stop Motion animation today, but others may find it useful as a reference when doing their own quick exports through Premier Pro.
(Note that I've put this together using a Mac CS5.5 so some things may look a little different but the same general ideas will apply)
(Also, if any of the images are too small to read just click on them to see them full size)
Set your project up with HDV in the capture format, and use Frames as your video display (which makes it easier for animators to work out their timing I find).
Make sure you choose HDV 1080p24 as your sequence preset, this will ensure you dont get squashed video when you import your footage onto the timeline.
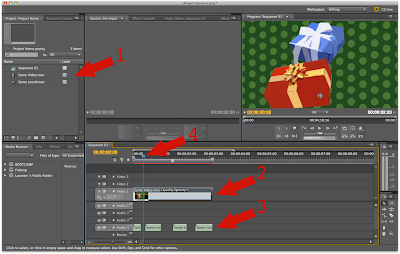
1 - You import your video footage and sound files into this area (Either: right click in this box and choose 'import' OR go to the 'file' menu and choose 'import' OR Ctrl and I)
2 - Drag your video files from area 1 into the timeline here.
3 - Drag sound files from area 1 into the timeline here you can then drag them forwards and backward (Right and Left) in time to align them. If sounds need to overlap each other then drag them down into the empty space below the 'Master' sound strack and it will create a new audio layer.
4 - Drag the blue playhead to move along the timeline.
When you are finished, go to the 'file' menu and chose 'export' then 'media'.
In the export settings make sure you make the following selections:
1 - Format = Quicktime (or if this is not available use WMV also known as Windows Media Video)
Make sure the 'Export Video' and 'Export Sound' check boxes are ticked.
Clicking on the 'Output Name' will let you name the file and choose the location it will be saved to.
2 - Video Codec = H.264
3 - Width = 1920
Height = 1080
Frame Rate = 24
Then just click the 'Export' button at the bottom.
Good luck!


No comments:
Post a Comment